Setup your development
Please refer to installation documentionCreate your first template
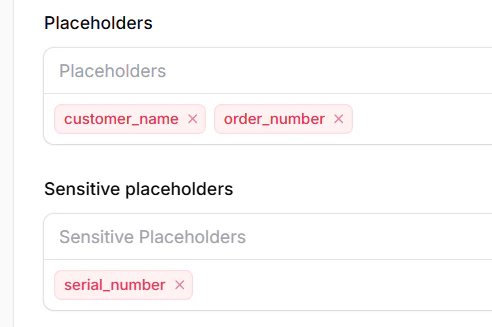
To start working on Mailer, you must create at least one template. You may start to define the placeholders aka—variables in your template. There are two kinds on variables- Public Placeholders
- Sensitive placeholders aka. private
Update the contact list
If you have a pre-defined list of email addresses that you frequently send emails to, you can streamline your process by creating a contact group. This will allow you to easily target a specific group of recipients without needing to manually input each email address into your API call. To create a contact group:- Define Your Group: Determine the criteria for your group (e.g., “Newsletter Subscribers,” “VIP Customers”).
- Add Members: Add the email addresses of the recipients you want to include in the group.
- Save the Group: Save your group with a descriptive name.
- Efficiency: Save time and effort by avoiding manual email address input.
- Accuracy: Reduce the risk of errors in email addresses.
- Organization: Keep your recipient lists organized and easy to manage.
Creating a Service to Send Your Emails
Once you’ve designed your email template, the next step is to create a service. This service will collect the necessary data and deliver your emails to the specified inboxes. To create a service, follow these steps:-
Choose Your Email Format:
- HTML: Ideal for rich, visually appealing emails with images, formatting, and links.
- Text: Suitable for plain-text emails, often used for simple notifications or updates.
-
Define Your Contact Groups:
- Specify the groups of recipients you want to target with your emails. You can create multiple groups based on different criteria (e.g., customer segments, location, interests).
- Generate an API Token: Obtain an API token from your account settings.
- Make API Calls: Use the generated API URL and your token to make API calls, providing the necessary data (e.g., recipient list, email content) for each email you want to send.